How to Repair External Hard Drive after it was Dropped
Get Your Data Back In No Time.
- Available 24/7/365
- No Data = No Charge
- 10+ Years in Business
- Free Nationwide Shipping
- Available 24/7/365
- No Data = No Charge
- 10+ Years in Business
- Free Nationwide Shipping






Before getting more in depth about how to fix an external hard drive after it was dropped, the first thing to do is STOP trying to power on the drive as this will only cause more damage to the platters making a Professional Data Recovery more challenging if not impossible. If you are not sure how to move forward, please give us a call and our Engineers will be happy to walk you through the process if you want to attempt a DIY (Do it yourself) repair.
So before moving forward with our DIY guide, please make sure you safely power down the drive and put it aside. Our guide will walk you through the entire process from diagnosis to repair. Please keep in mind, that you will need special tools and resources to get this done. We always discourage DIY (Do it Yourself) attempts, but we understand that sometimes people prefer to attempt the recovery themselves before seeking a professional. So we’re happy to take away some of the risks and issues you can deal with by providing useful information here.
Step 1: Understand the problem with the drive:
Before we try to fix the issue with the drive, we want to understand what the exact problem is. Is the hard drive clicking, or beeping or does it not have power whatsoever? Depending on this, we can take the next steps toward repairing the drive in order to get our data back. We will go ahead and break down each issue separately. Please skip to the section that applies to your problem.
- Clicking: If the hard drive is making clicking sounds after it was dropped, then the issue with your drive is either bad read/write heads OR media damage. IF the issue is the heads, you can attempt a head swap and regain access to the data. IF the issue is media damage (damage to the platters where the data is stored), then the data would most probably be unrecoverable. How to tell IF the issue is read/write heads or media damage? Plus jump to Step #2.
- Beeping: If your hard drive is making beeping sounds after it was dropped, the issue with your drive is called “Stiction.” This is where the read/write heads have crashed on top of the platters, not allowing the platters to spin, and thus making a beeping like sound. Please do not rush to watch YouTube videos on how to repair this problem. There is more to the process than just the physical part of bringing the heads back. We will explain in detail in this guide. Plus jump to Step #2.
- Drives spins normally, but does not mount: Its important to put your ear to the drive and listen carefully to understand whats going on with the drive. If you hear the drive spinning up and its not making any unusual sounds, BUT its not mounting on the computer, this is a pretty good sign. Chances are that the issue with your drive is a damaged file system or firmware related (if its firmware related, you may need to seek a professional as you will need a special tool to repair the problem; PC-3000 by Ace Laboratory). We would still recommend you jump to Step 3 just to make sure everything inside the drive cover is okay and there is not physical damage.
Step 2: Inspecting the Inside of the Drive:
This step of the process is very important. Please do not rush and skip steps. Data Recovery is not about speed, its about precision. You only get one good chance at recovering the data, please don’t rush. One small mistake can make your data unrecoverable forever. If you are not sure about something, just patiently put everything aside, take a break and post a comment below and one of our engineers will be happy to give you advice. We can’t stress this enough.
We will break down the inspection process based on the 3 different issues you may experience. Please jump to the section that best applies to your problem.
IMPORTANT: In this step, you are going to open the actual drive cover (not the enclosure for the drive, but the actual metal drive cover where the platters are stored. WE DO NOT RECOMMEND YOU DO THIS YOURSELF, but if you are determined to get it done, please follow all of our steps carefully. Before you start to open the drives cover, make sure you have all the tools you need. If you don’t have the exact screwdriver (Usually T5, T6, T8), please order the correct tools and don’t risk stripping any screws. You will also need pliers for when we remove the magnet that is holding the head assembly down. Anytime you get stuck, just take a break and post a comment below and we will respond promptly.
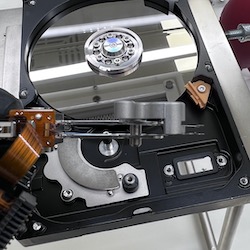
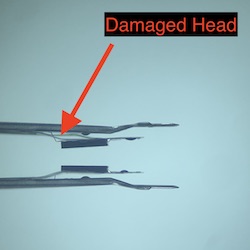
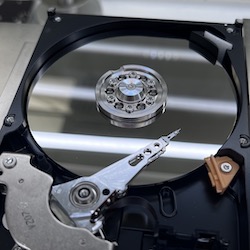
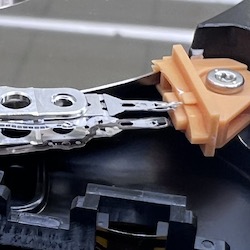
Clicking: If your issue is clicking, then what we need to do is first take a look at the platters to make sure there are no noticeable scratches or contamination on the top surface. We always use a green light (which can be purchased from Amazon) to make sure the surface is clean. If the surface is clean, that’s great! We now need to check the read/write heads to make sure they are not physically damaged or contaminated. In our lab, we use head tools from HDD Surgery. But for your case, you can either purchase a more affordable head comb from eBay or you can make your own. Please check our other posts where we show you how to make a head comb using a piece of plastic. (Why do we need a head comb to remove the heads? Because if you don’t use the head comb, as soon as you slide the heads off of the ramp, the sliders will touch and get destroyed. The head comb helps keep the sliders separated). Now that you have all the tools you need, grab a cup of coffee before you start and let’s remove the heads:
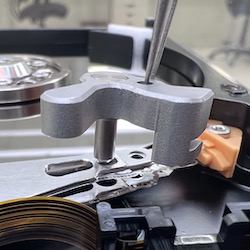
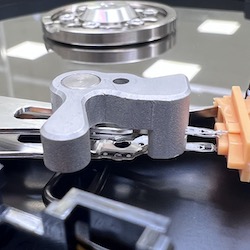
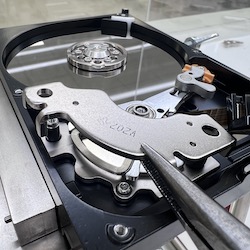
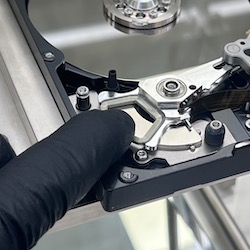
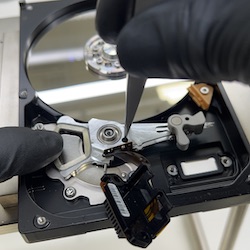
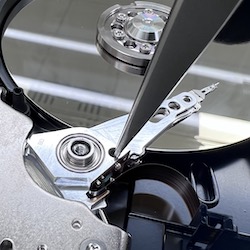
- Step 1: Place the head comb on the read/write heads. There is a special hole that the pin would go through, then slowly and gently press the tool onto the heads (please see photos). If you are using the piece of plastic as a head comb, carefully use a tweezer to place the plastic between each one of the heads. Once the tool is secure, your ready for Step 2:
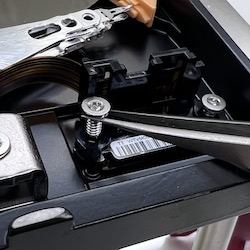
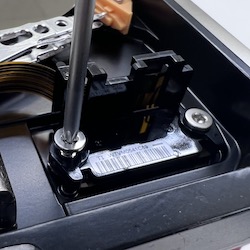
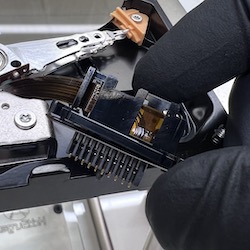
- Step 2: Remove the two screws that are securing the hard drive cable connector to the drive case. Once that is removed, carefully pull the connector up out of its place (don’t pull to hard as its connected to the read/write head assembly). Just enough to get it out of its place.
- Step 3: Remove the screw holding the Magnet in place. Using the tweezers, get a good grip on the magnet from the rear, and firmly raise it up off of the head assembly.
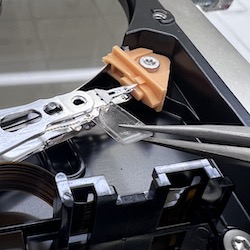
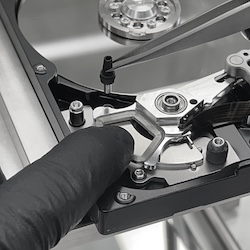
- Step 4: Depending on what model drive you have, there might be a parking brake that will prevent the heads from coming off of the ramps. Please carefully remove this pin using the tweezers. You can carefully move the heads forward to relieve tension from the pin (by holding it from the back of the head assembly), then pull the pin straight up. At this point, we have the head comb in place, screws are removed, magnet is removed, parking brake is off (allowing the heads to come off the ramps).
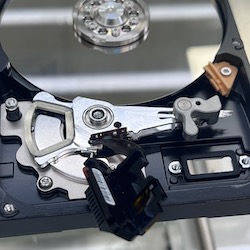
- Step 5: Here we will remove the entire headstack assembly from the drive. Some models will have a screw underneath the drive that is holding the headstack in place and other models you will be able to carefully pull the heads straight up and out of the drive. While you remove the heads from the drive, it’s important that you keep you eye on the sliders (tip of the heads). Make sure you are holding the heads all the way back and away from the parking ramps.
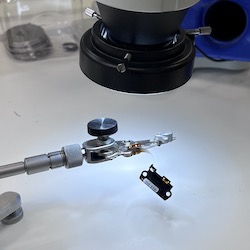
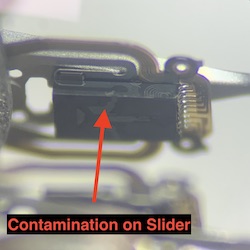
- Step 6: You now have the heads out of the drive. What you need to do now is inspect the sliders (tiny black readers) under a microscope to see if there is any contamination on them. These sliders should be super clean and shiny. Not a spec of contamination. IF they are clean, then your chances of recovering the data is much higher. IF there is contamination, your chances are slimmer, but still could be recoverable. You are now reading for the next step of the process. Please jump down to Step 3.
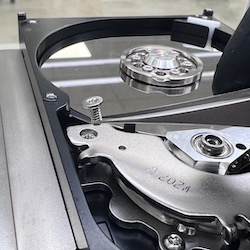
Beeping: If your issue is beeping, the first thing you need to do is observe the situation inside the drive in detail. Don’t touch anything yet. Your looking to make sure there are no scratches or contamination on the top surface. You could use a green light for the best results. If there are no scratches or contamination, you are ready for the next big step. We DO NOT RECOMMEND you do this yourself, but again, if you are determined to get it done, please follow the steps carefully and do no rush. One wrong move and the data could be gone forever.
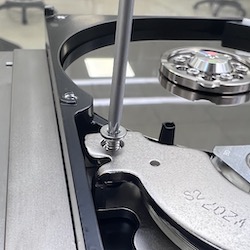
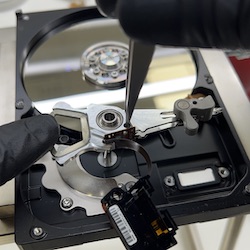
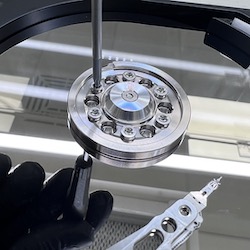
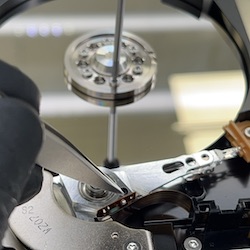
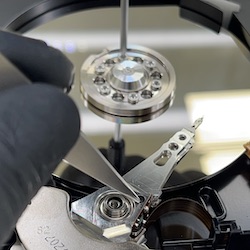
- Step 1: In the center of the drive, you have a screw or screws that is holding the platters down. Find the correct size screwdriver (must be exact one) and get it ready. What we’re trying to accomplish here is to bring the heads that are stuck on the platters back onto the parking ramps in one smooth motion. This gets done by spinning the platters (using the screwdriver) and at the same time using tweezers to pull the heads back. DON’T do anything yet.
- Step 2: So now you understand what has to be done (the concept), you have the right screwdriver and tweezers. With your right hand, you will be turning the screw with the screwdriver and with your left hand using the tweezers to bring the heads straight back and off of the platters. (place the tip of the tweezers in the hole shown in the photos). Practice this motion before doing the process on the actual drive.
- Step 3: At this point, you have successfully removed the heads from the platters, but your work is still not done. DO NOT just put the drive cover back on and turn on the drive. IF the read/write heads are physically damage OR if there is contamination on the sliders, powering on the drive will destroy the data forever. You will need to remove the heads from the drive and inspect them under the microscope or magnifying glass to make sure they are not damaged.
- Step 4: Please follow all of the steps from the “Clicking” section above. The process to remove the heads from the drive for inspection is exactly the same. This step is extremely important. We have heard many people successfully recover the data without removing the heads, but we have seen more customers come in with drives that are unrecoverable because they skipped this process. (Image this: IF the read/write heads got mangled in the process of removing them from them platters, IF you don’t check them first and you just power on the drive, the mangled heads are going to scrape the disks and make the data unrecoverable no matter what. Data Recovery doesn’t like being rushed. Once you have the followed the steps to remove the heads from the drive, you can jump to Step 3.
Drive Spins but doesn’t mount: If after dropping your drive, your drive spins normally (and you’ve verified this by putting your ear to the drive), but doesn’t mount on your computer, then you have the best chances of recovering the data. Since the chances are high that your issue is not mechanical, we can first troubleshoot with a computer before opening the drive cover.
- Step 1: Connect your drive to the computer. Although the drive does not mount as it normally should, we want to see if the drive is being recognized by the bios of the computer. If you are using a Mac, please go to “Disk Utility.” If you are using a PC, please go to “Disk Management.” Do you see your drive listed here?
- Step 2: If you do see your drive listed here, pay attention to how its seen by the computer. Does the computer recognize the correct capacity of the drive? If the size of the drive is recognized correctly, that is an excellent sign! Please continue to Step 3. IF your drive is not listed here whatsoever, please power down the drive and put it aside. The issue with your drive is either firmware related (programming) or mechanical. We would recommend seeking a professional and not continuing with the DIY fix. Why? Because chances are high that your issue is firmware related. IF it is, firmware level recoveries are not expensive at all. If you try to open your drive to fix a mechanical issue, but it turns out that your problem was only firmware related, you will end up paying a Professional Data Recovery company 3x what you would have paid if you would have just sent it to them to begin with. Firmware issues are impossible to repair on your own. You would need a special tool called PC-3000 by Ace Labs to fix these types of problems.
- Step 3: Applies ONLY if the bios of your computer was able to recognize the drives correct capacity. So your drive spins up normally, the computer detects the correct capacity of the drive. What you can try to do here is you can try to run Data Recovery Software on the drive. We DO NOT recommend you do this as the software could spread media damage if you have light media damage in some areas, but if you are determined, you can try this cautiously.
- Step 4: Download data recovery software from the internet and start the scan process. Please do NOT leave the computer unattended during the scanning process. It’s important that you monitor the entire scanning process. What your looking for here is to see if the software is able to scan all of the sectors of the drive at a normal speed. If the see the scanning getting stuck at certain points, please stop the process as soon as possible and safely power down the drive. Your chances of recovering the data by a Professional Data Recovery company is very high. It would be a logical recovery that is usually covered under flat rate fees of $300.00 or $400.00. Consumer level software won’t be able to probably scan/image the drive.
- Step 5: If the scan went through successfully without any errors, you can start saving the recovered data. But even during this process, keep your eye on the process and don’t leave the process unattended. Errors left unattended can cause serious damage to the drive.
Step 3: Attempting a Head Swap
By this point, you have already inspected the inside of the drive, removed the heads from the drive, and inspected the sliders and now you’re ready to replace the heads with a compatible donor. What is a compatible donor? A compatible donor part is another drive that is a near identical part. So typically what you want to make on the drives label is the following:
- Drive Model Number (exact)
- Part Number (exact)
- Country Manufactured (exact)
- Data of Manufacturer (within 3 months)
- DCM (WD Drive)
The more you match the drive’s label, the higher the chances that the donor part will work. The process of the “Head Swap” is identical to how you removed the heads from your original bad drive. Simply follow all of the steps one by one to remove the heads from the donor drive, then work backward to reassemble the drive. Key points to pay attention to when reassembling the drive:
- Use tweezers to hold the headstack assembly as you’re putting it back in the drive.
- Carefully hold the heads all the way back (away from the parking ramps) as you’re tightening the bottom screw that holds the heads in place.
- Once you have tightened the bottom screw, carefully allow the heads to go back into their position on the ramp. The heads should slide nicely back into their position. If you feel like it requires force, please stop and realign the head tool. There should be no force required at all.
- While you gently hold the heads in their place on the parking ramp, put the parking brake pin back in its position and carefully put the magnet back on top of the headstack assembly (be careful for it to not pull down too hard as it’s a strong magnet).
- When tightening the hard drive cover screws, tighten them in a zig-zag order and in small increments (don’t tighten one screw too much at once).
Conclusion
We hope this guide was useful in helping you recover the data from your drive. Please don’t hesitate to contact us via the comment section below if you have any questions about our Data Recovery process. This blog post was brought to you by our Head Engineer Vahan Hovsepian.
Final Disclaimer: If the data on your drive is irreplaceable (ex: family photos, business documents, production files, etc), please do not attempt to recover the data on your own. If you’re trying to recover data that is easily replaceable and you can’t justify the cost of professional data recovery, then have fun with the process; we’re here to help give you advice and guidance. But don’t try this process on data that is irreplaceable.
Social Media

“Awesome Work!”
When we dropped our photo hard drive and it started making clicking sounds, we thought we had lost everything. All our memories gone in an instant. This place not only recovered all our files, they were completely upfront and honest about the process and explained why certain kinds of damage cost more than others. They were able to get us our precious memories back and for less than the higher end of what they said it could cost. Highly recommended!
Mikey W.

“Truely 5 Stars”
Don’t trust your important data anywhere else. These guys are the best. It’s all in the name: 5 star performance and service all the way. You’ll know from your first call. They came in on a Sunday especially for me specifically to ensure a greater chance of recovery of my data and, sure enough, their tenacity paid off. 100% real review. This place is where it’s at. Honestly: don’t go anywhere else. Don’t even think about it. Thank you guys!
Arin K.

“Thank You!”
My son’s laptop hard drive failed, and I knew how much all the data on there meant to him. So I was over the moon when Five Star was able to get the data back. There were a number of issues with the drive, and I felt like they went over and above to try additional steps when they found each new issue, until the data was recovered. Their communication was thorough and timely, and they explained everything they were doing very thoroughly.
Vance K.
Latest Posts
USB Data Recovery (Chip Off)
USB Data Recovery (Chip Off) Get Your Data Back In No Time. Start Recovery Request a Quote Start Recovery Request a Quote Available 24/7/365 No
How to Repair External Hard Drive after it was Dropped
How to Repair External Hard Drive after it was Dropped Get Your Data Back In No Time. Start Recovery Request a Quote Start Recovery Request

